


Here uobdii.com shares the newest VW software download link, activation and installation guide for VAS6154 genuine devices and multi J2534 Passthru incl. VNCI 6154A, VXDIAG VCX SE 6154, Godiag J2534, SVCI 6154, Xhorse MVCI Pro, Autel MaxiFlash JVCI, JVCI+, MaxiFlash Elite, MaxiVCI V200, Openport 2.0, etc.
1.Free download VAG VW Audi Skoda Seat ODIS Offboard Diagnostic Service software V23.01
https://mega.nz/folder/eiwTxZzT#D0K7HMtuw1GIyJ9nKlNJtA
Free download VAG VW Audi Skoda Seat ODIS Engineering software V17.0
https://mega.nz/folder/CiwWAKqK#kWIc4VfofhXvbEaPcVwT7w
Keygens are not included.
You also can get a U disk containing both ODIS-E V17 and ODIS-S V23:

https://www.uobdii.com/wholesale/32g-usb-disk-for-odis-v11-software.html
*We provide 1 time free activation by keygen.
2.Software Information:
- Release name: Offboard Diagnostic Information System Service v23
- Type of Software: Diagnostic
- Capacity: about 18.1 GB
- Version: ODIS-S 230001.105.130
- Vehicle Connection:
+ Version of ECF: 57.6.2
+ Version of VW-MCD: 20.0.0
+ Version of VW D-PDU API: 3.0.0
- PostSetup: 0105_9-20230612
- License: Included License Standalone and License for all brand
- Brand: VAG (Audi, Bentley, Bugati, FAW-Volkswagen, Lamborghini, MAN, Seatm Volkswagen, Skoda)
- Region: All regions
- Language: English
3.Related test report by uobdii.com engineer:
| Product | Vehicle tested | ECU model | Protocol | ODIS S 11 | ODIS S 23.0.1 | ODIS E 17.01 | Remark |
| VNCI 6154A (SP447)
GODIAG GD101 J2534 (SP421-B)
VXDIAG VW (SP379)
XHORSE MVCI (SP455) |
2007 AUDI A6 | MED9.1 | KWP2000 | √ | √ | √ | |
| 2005 VW Caddy | EDC16U1 | KWP2000 | √ | √ | √ | ||
| 2007 VW Passat | CAN BUS | √ | √ | √ | |||
| 2017 VW Passat | SIMOS 18.3 | CAN BUS | √ | √ | √ | ||
| 2008 Audi A6 | SIMOS 6.22A | CAN BUS | √ | √ | √ | ||
| 2008 VW Passat | MED17.5 | CAN BUS | √ | X (XHORSE MVCI supports full system diagnosis, VXDIAG VW/VNCI 6154A/ Godiag J2534 don’t support, only support OBD scan) | √ | X431 V/Vident ieasy 310 pro test OK | |
| 2008 AUDI A6 | SIMOS 8.10 | CAN BUS | X | X | √ | X431 V test OK |
4.Operating system requirement:
- Windows 10 (ODIS Service 23.0.1 and ODIS- E V17 work only on Windows 10 or more)
- Installed libraries (DLL) for Microsoft Visual Studio 2010: vcredist_x86.exe
- Installed Visual C++ Redistributable x86 for Microsoft Visual Studio 2010: vcredist_x86.exe
Internet Explorer 11.0
- Adobe Acrobat Reader Version 11 or Adobe Acrobat Reader DC
- Font Arial Unicode MS Regular
- CPU minimum 2GHz recommended
- RAM >= 4 GB
- Free hard disk storage > 40 GB, standard file system NTFS
- The software uses standard windows installation paths
5.Step-by-step to install ODIS-S V23 software:
Step 1: Install ODIS-S V23 Setup
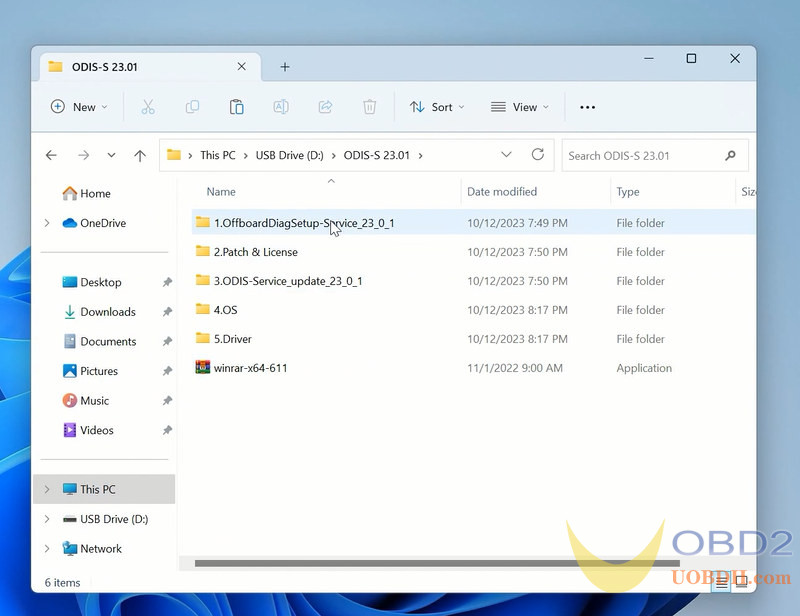
Open ODIS-S 23.01 folder
Open OffboardDiagSetup-Service-23_0_1 folder
Extract OffboardDiagSetup-Service_VWMCD_23_0_1.rar
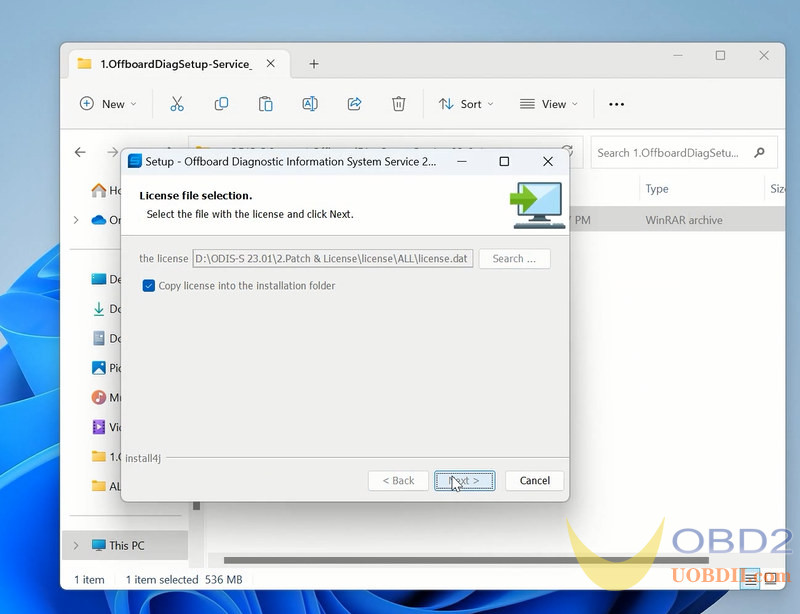
Install ODIS-S setup
Select setup language
Wait until the setup installation is completed


Step 2: Activate ODIS-S 23
Open 2.Patch& License folder
Copy all files from patch folder and paste them to Win11ProW X64/Program Files/OS folder

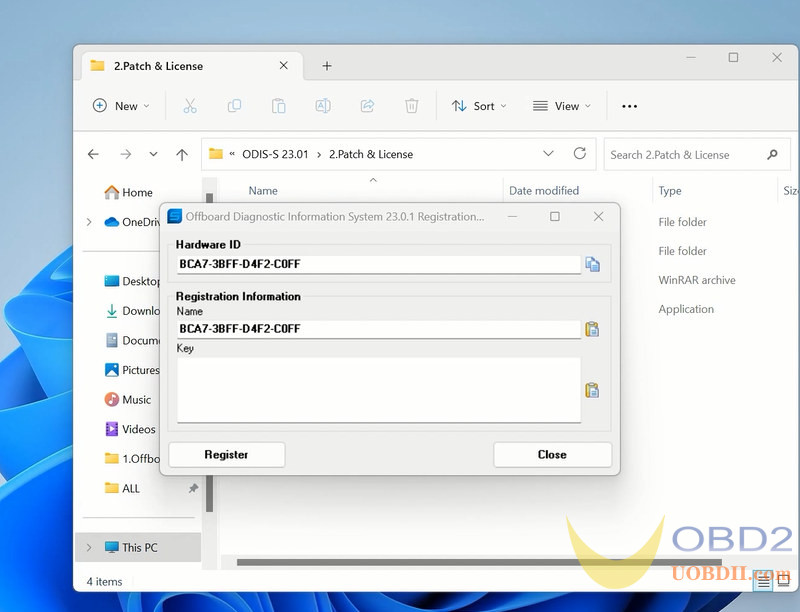
Run OffboardDiagnostic on desktop as administrator
It will ask for an activation key
Send the hardware ID to uobdii.com, we will send you back the activation key, press Register
Step 3: Install PostSetup
Open 3.ODIS-Service_update_23_0_1 folder
Open ODIS-Service_update-23_0_1-EU_20230711 file with Winrar
Create a new folder to E and extract file to disk E
In PostSetup select from file:/E:/ODIS-Service_update_23_0_1_EU_20230711 folder
press Next (don’t need to input user name and password)
Select PostSetup language
Wait until postsetup installation finished


Step 4: Copy license
Copy the “license Standalone” folder to C:/ProgramData/OS
Copy shortcut icon in the “Desktop” folder to desktop

Step 5: Install Driver
Open 5.Driver folder
Install the driver for the corresponding device.

For example, install VX Manager driver for VXDIAG VCX SE 6154

Connect the device with the laptop via USB
Check if the device is well connected in the Device Manager
Run VX Manager, check device is detected
Install or update 6154 driver

Step 6:
Run the corresponding software icon on desktop
6.Step-by-step to install ODIS E V17:
Step 1: Install ODIS-E V17 Setup
Open ODIS-E 17.0.1 folder
Open ODIS-Engineering_17_0_1 folder
Run OffboardDiagSetup-Engineering-17_0_1
Select Setup language
Press Next
Select diagnostic interface as VAS 6154 and press Next
Then software will ask license for activation
Open license.dat from ODIS-E 17.0.1/Patch & License folder
Select Create folder in the start menu and create shortcuts for all users
Installing Setup until finished

Step 2: Activate ODIS-E
Run Patch & License folder, open 17.0.1 patch folder
Copy all three files from 17.0.1 patch folder and paste to Win11ProW X64/Program Files/OE folder
Send OffboardDiagLauncher_protected from Win11ProW X64/Program Files/OE to desktop
Rename OffboardDiagLauncher_protected desktop shortcut as ODIS E 17.01 and run it

ODIS-E will ask for an activation key
Send the hardware ID to uobdii.com engineer and we will send you back the activation key
Input the activation key and press Register

Step 3: Install PostSetup
Open PostSetup_202300619.iso on ODIS-E 17.0.1 folder as Winrar file
Extract PostSetup 202300619 file to Disk E


In ODIS-E 17.01 if we select file location to E:/ODIS_Engineering, it says no valid software configuration.
We do this.
Create a new ODIS Engineer 17.01 folder on disk E, copy ODIS Engineering folder to this new folder.
Select local directory as file:E:/ODIS_Engineering 17.01/, it should be fine.
Select PostSetup language
Wait until postsetup installation finished


Restart the operating system

Step 4: Exact VWMCD
Unzip VWMCD file in 4.VWMCD folder
and extract to C:/ProgramData/OE/MCD-projects-E/VWMCD folder

Step 5: Install Driver
The U disk contains both ODIS-S and ODIS-E software. Drivers are in the ODIS-S 23.0.1 folder.
Install the corresponding driver
If already installed driver for ODIS-S, don’t need to install the same driver for ODIS-E again.
Step 6: Run ODIS-E 17
Run ODIS-E 17.01 on desktop
Software is ready to use.

Done!
